When it comes to customizing your Windows 10 experience, altering the boot logo is an often overlooked, yet incredibly impactful change. The boot logo, also known as the splash screen or startup image, is the first thing users see as they boot up their machines. By changing it, you can personalize the user experience or enhance your organization’s branding. In this guide, we’ll walk you through the steps involved in how to change the boot logo in Windows 10, the tools you’ll need, and how to achieve a fully customized startup sequence for your system.
Whether you’re an IT admin or a tech enthusiast looking to tweak your Windows 10 installation, this blog post will provide detailed instructions on how to boot Windows with a custom logo, along with the necessary considerations for a smooth, secure, and efficient process.
Understanding the Boot Logo and Its Importance
Before diving into the technicalities of how to change boot logo in Windows 10, it’s crucial to understand the role of the boot logo itself. The boot logo is displayed during the startup process of your computer before the operating system loads. It’s part of the boot graphics resource table (BGRt) that holds the necessary images for system startup.
What Does the Boot Logo Represent?
The boot logo is a visual representation of the system’s integrity and brand. For personal computers, it could simply be a logo of the manufacturer or a custom graphic. For enterprise environments, businesses often prefer a custom logo that represents their branding or simply a more professional or themed startup sequence. Customizing the boot logo can be a good way to improve the user experience, create a cohesive look, and impress stakeholders.
Why Change the Boot Logo in Windows 10?
There are many reasons you may want to customize the Windows 10 boot logo. For instance, when managing multiple devices across a network, a custom logo can help easily identify machines. Additionally, it adds an element of personalization or professionalism for users, particularly when utilizing devices for corporate environments.

How to Get a Custom Windows 10 Boot Logo
To customize the Windows 10 boot logo, you’ll need specialized tools and software to ensure the changes are made safely and effectively. In this section, we’ll introduce the tools you can use and provide a step-by-step walkthrough of the process to help you successfully customize your Windows 10 boot logo.
1. Using HackBGRT (Recommended for UEFI Systems)
HackBGRT is a popular and reliable tool for customizing the boot logo on Windows 10 systems with UEFI firmware. It modifies the Boot Graphics Resource Table (BGRT) to replace the default logo with a custom image.
Steps to Use HackBGRT:
- Download and install HackBGRT.
- Disable Secure Boot in the BIOS/UEFI settings.
- Choose a custom BMP or PNG image and apply it using the tool.
- Restart the system to see your custom logo.
Pros:
- Easy to use with a user-friendly interface.
- Reversible changes (includes backup functionality).
Cons:
- Only works on UEFI-based systems.
- Requires Secure Boot to be disabled.
2. OEM-Specific Firmware Tools
Some OEMs (e.g., Dell, Lenovo, HP) provide built-in options to change the boot logo via their BIOS or firmware interface. These tools are often found in the BIOS/UEFI settings and let you upload a custom image directly.
Steps:
- Enter BIOS/UEFI settings during startup (e.g., by pressing F2, F12, or DEL).
- Look for branding or logo customization options.
- Upload your custom image (format and size requirements vary).
- Save changes and restart.
Pros:
- Simple and secure process.
- No third-party software needed.
Cons:
- Only available for specific OEM devices.
- Limited customization options.
3. Third-Party Boot Customization Apps
Third-party tools like Boot Logo Changer or similar apps offer a more visual way to change the boot logo. These tools often have intuitive interfaces and additional features, such as resolution adjustments or pre-made logo libraries.
Steps:
- Download a trusted third-party boot customization app.
- Follow the app’s instructions to select and apply a custom boot logo.
- Restart the system to verify the changes.
Pros:
- Easy to use for beginners.
- May include additional customization features like multi-logo support.
Cons:
- Compatibility issues with some Windows updates.
- Potential security risks with unverified apps.
4. Manual Modification of BGRT
For advanced users, manually editing the BGRT is an option. This method involves extracting the UEFI firmware, replacing the logo image, and flashing the modified firmware back onto the system.
Steps:
- Use tools like UEFITool to extract the firmware image.
- Replace the default boot logo file with your custom image.
- Flash the modified firmware using a firmware update utility.
Pros:
- Total control over customization.
- Works on any UEFI system with supported firmware tools.
Cons:
- Complex and risky (high chance of bricking the device).
- Time-consuming and not recommended for casual users.
5. Using Group Policy Editor for Lock and Sign-in Screens (Partial Customization)
Although not a direct boot logo change, you can customize the lock screen image or the background shown during sign-in.
Steps:
- Open Group Policy Editor (gpedit.msc).
- Navigate to Computer Configuration > Administrative Templates > Control Panel > Personalization.
- Enable the policy to “Force a specific default lock screen and logon image” and specify your custom image.
Pros:
- Simple process for customizing user-facing screens.
- No third-party tools required.
Cons:
- Doesn’t change the actual boot logo.
- Limited to lock screen and sign-in background.
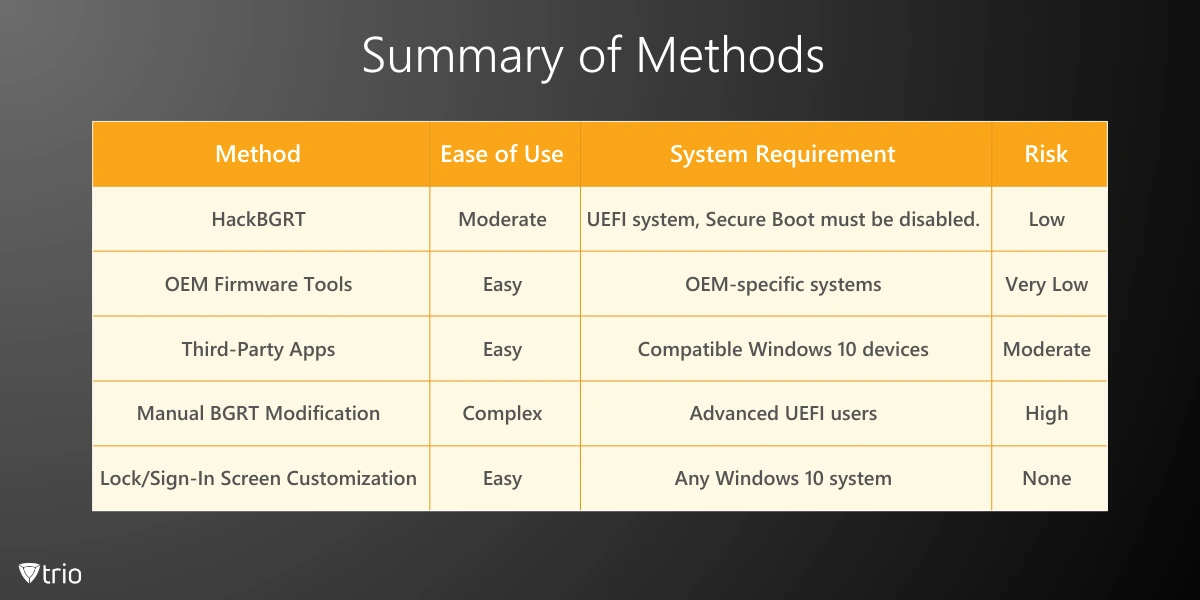
Summary of Methods
By selecting the method that aligns with your system and technical expertise, you can successfully customize your Windows 10 boot logo and enhance your boot experience.

Troubleshooting Common Issues
Sometimes, when altering the boot logo or other system components, issues can arise. Here’s a look at some common problems you might face and how to resolve them.
The Boot Logo Doesn’t Display Properly
If your boot logo doesn’t appear or is distorted, it might be due to incorrect image dimensions. Ensure that the image you’re using has the correct resolution for your system. Additionally, some systems might not support certain formats or large image sizes. Recheck your logo file’s specifications and try a smaller or different file type.
How to Restore the Default Boot Logo
If you decide you no longer want your custom boot logo, you can always revert to the default Windows 10 logo. HackBGRT makes it easy to restore the default logo by simply selecting the “Restore” option within the tool.
Trio’s MDM Solution: Managing Custom Boot Logos Across Devices
For businesses looking to apply custom boot logos on multiple devices, managing this change through a centralized solution is key. This is where an MDM (Mobile Device Management) solution like Trio becomes very important.
Streamlining IT Management with Trio
Trio offers a full suite of features to simplify IT management. By integrating Trio MDM into your operations, businesses can maintain consistency in device configurations, security settings, and even user experience across all Windows-based systems. Whether you’re applying a custom boot logo or ensuring other system settings are standardized, Trio’s MDM for Windows can make the process seamless and efficient.
If you’re interested in exploring how Trio can help with managing custom boot logos and more, sign up for a free demo today.
See Trio in Action: Get Your Free Trial Now!
Conclusion
Customizing the boot logo in Windows 10 is a great way to personalize your system or reinforce company branding. Whether you’re an IT administrator or a tech enthusiast, changing the boot logo can be done easily with the right tools. By following the step-by-step instructions in this guide, you can change the default boot logo to something more fitting for your needs. Additionally, if you’re managing multiple devices, a solution like Trio can streamline this process and ensure consistency across your fleet of systems.
Get Ahead of the Curve
Every organization today needs a solution to automate time-consuming tasks and strengthen security.
Without the right tools, manual processes drain resources and leave gaps in protection. Trio MDM is designed to solve this problem, automating key tasks, boosting security, and ensuring compliance with ease.
Don't let inefficiencies hold you back. Learn how Trio MDM can revolutionize your IT operations or request a free trial today!


